![]()
|
|
|
|
|
|
Default Settings will clear all general
and scan-specific settings (but not preferences)
and return them to their default values. |
|
|
Load Scan
Settings (F11) will open the form below, which allows you to load a previously-saved TCScan+ settings file.
As you click or move through the files shown in the right-hand pane,
summary details of the file will be shown in the lower-left pane.
This form also allows you to specify how you want the lists stored in the
settings file to be loaded. You can choose to add the lists in the
file to your current list selection, ignore the lists in the file, or
replace your current list selection with those in the file. This
setting, as well as the file name you select, will be saved as defaults for
the next time you load settings again. To delete
a settings file click the Delete button on the top right of the file list
pane. |
|
|
Save Scan
Settings (Shift F11) allows you to save the
current TCScan+ settings in a file that you can load
later. The TCScan+ settings files have extension '.tcs',
and are stored by default in the directory in which
you installed TCScan+, though you can store them
anywhere you like. Double-clicking one of these files will launch TCScan+
and open the file in it. It is useful to create a number of
settings files to handle different scenarios, for
example you could create one for oversold market
conditions, and one for overbought. You could also
have a bottom fishing, or rolling stock scenario,
along with a long term buy and hold scenario. There are a number of
example settings files included in your TCScan+ directory. The
settings file Last.tcs contains the settings
that TCScan+ had when it was last closed, or until you
unchecked the Save
Settings preference. The settings in Last.tcs
are always loaded when TCScan+ first starts up. |
|
|
Start Scan
(F9) allows you to start the scan. Once the scan has
started, this menu item will change to Stop Scan,
which will allow you to halt the scan. Clicking this
menu item is equivalent to pressing the Scan button at
the bottom of the TCScan+ form. |
|
|
Scan Single Item (Ctrl F9) allows you to run the scan
for a single item only, instead of the selected
lists. Note that all the usual filters apply to this
scan, so even though you run a scan for a specific item, it might not appear in the results
table. You can select the Ignore Filter
option to ignore the filter criteria and make sure the item appears in the results table. |
|
|
Scan Results (Shift F9) allows you to run the scan for
the group of items produced in your last complete scan or for
a group of items stored in a results
file. For the latter option, you can scan either 'Names Only' (TXT)
or 'Names and Values' (CSV) files. You can also
use another program to create a list of stocks that
you can scan. The file must have a separate name
on each line, and must have a 'txt' extension. |
|
|
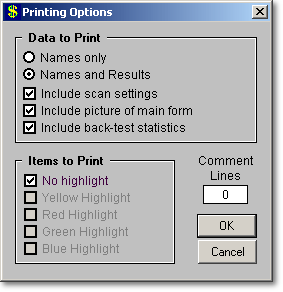
Print Scan
Results (Ctrl P) will open the form shown below, which will allow
you to print some or all of your scan results. Clicking this menu item is equivalent to clicking the
Print button at the bottom of the main TCScan+ form. The items in the Data
to Print section are equivalent to the options shown on the Preferences
form. The Items to Print section allows you to select which highlighted
or un-highlighted results you want to print. The Comment Lines
textbox allows you to specify whether the results list should be printed
with empty lines following each item to allow you space to write comments
later.
|
|
|
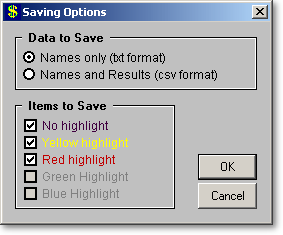
Save Scan Results (F12) will allow you to save the information in the results table to a file. You can choose whether to save all your results or only highlighted ones. You also have two file format options for saving:
|
|
|
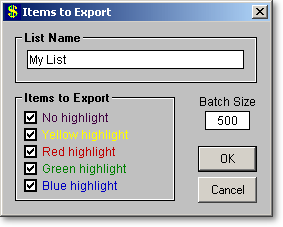
Export
Scan Results (Shift-F12) will allow you to export some or all of the
items in your results list directly to TeleChart (see the form
below.) Other ways of accessing this command are to click the L
key while an item in the results list is selected or to hold down the Shift
key while clicking the save button at the bottom of the main form. TeleChart
do not have a direct mechanism to
allow other programs to cause them to import items, so TCScan+ has had to
resort to some advanced windows control. This technique does
sometime run into problems, and one of the ways you can correct it is by
reducing the Batch Size. This limits the
number of items transferred to TeleChart at a time and reducing this
number normally corrects problems. If all else fails, however, you
can always use the manual method described in the Getting
Started Guide. |
|
|
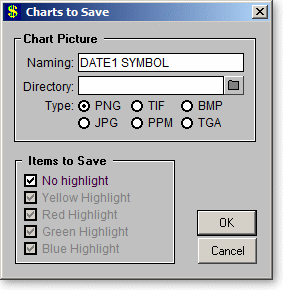
Save Chart Pictures
Selecting Save Chart Pictures will bring up a form allowing
you to save chart pictures for multiple items in the results list.
You can access the same command from the Chart's File > Save Chart
Pictures for Results List menu
or Save Chart Pictures
from the results list popup menu.
|
The layout of the form is similar to those
above, in that you can choose whether to save pictures for all your
results or only
highlighted ones.
There also are options to provide a naming template for the files, the
directory where to save them and the file type. Hovering the mouse
over the Naming box on the form will bring up popup help on the naming
format, as shown below. As an example, if MSFT is in your results
list and you use the naming template 'DATE1 SYMBOL' (the default) as
shown in the above, the file will be called '09-08-08 MSFT.png'.
Note that you can add any extra text you like anywhere in the template.
For example changing the naming template to 'Test Scan DATE1 (SYMBOL -
NAME)' will create a file called 'Test Scan 09-08-08 (MSFT - Microsoft
Corp).png'
![]()
![]()
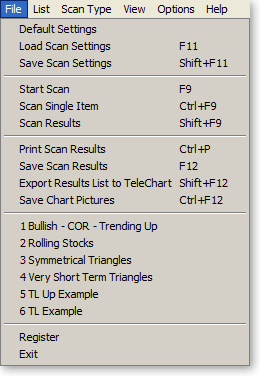
Recent Files List
Contains a list of up to 6 of the last settings files you either loaded or
saved. Clicking on one of these items will load the applicable
settings file. |
|
|
Register
will bring up the registration
form, which will allow you to purchase and
register TCScan+. |
|
|
Exit
will close TCScan+. |